jerryy
-
Posts
1,926 -
Joined
-
Last visited
-
Days Won
304
Content Type
Forums
Gallery
Store
Everything posted by jerryy
-
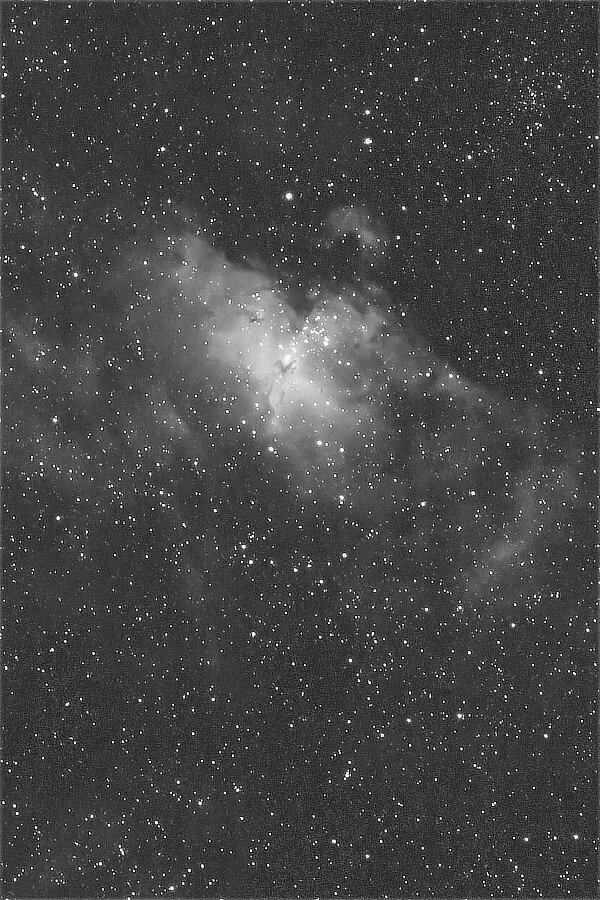
Part two of two. Some deep sky objects also look good in black and white. The red channel in the previous image has a lot of detail: Getting closer to M16, The Pillars of Creation jump out a little more: it is easy to see why using monochrome cameras with special filters is so popular in astrophotography. Note: while this one channel approach works okay here, it is only sort-of like what you would get using a monochrome camera with filters. Folks that use that kind of equipment will tell you that monochrome bodies give you more detail in the images for the same exposure length because there is no color filter array in front of the sensor to block some of the light coming in. Also, using a basic color body as I am doing here does not give you only the Hydrogen Alpha light; the red colors from Nitrogen (Nii) and Sulfur (Sii) also are put into the red channel.

-
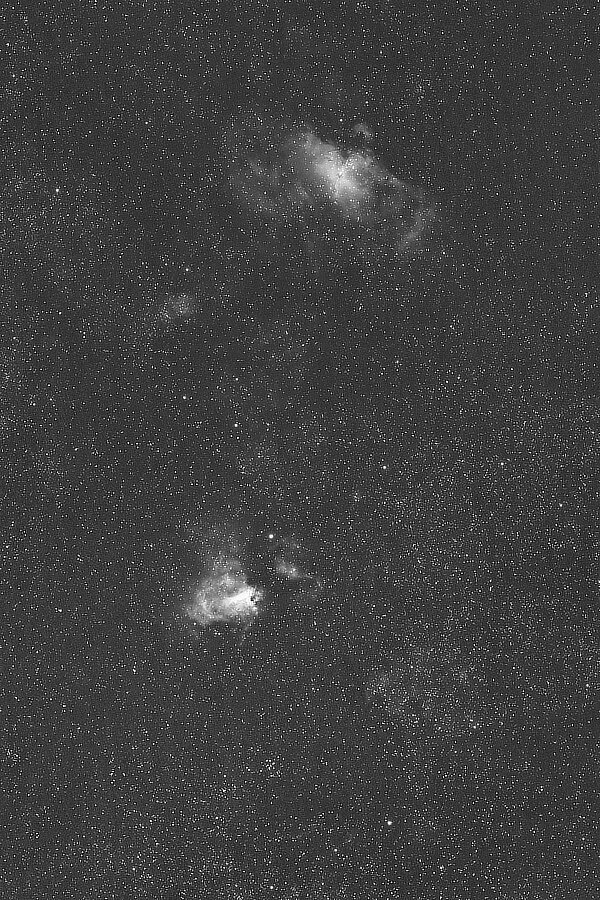
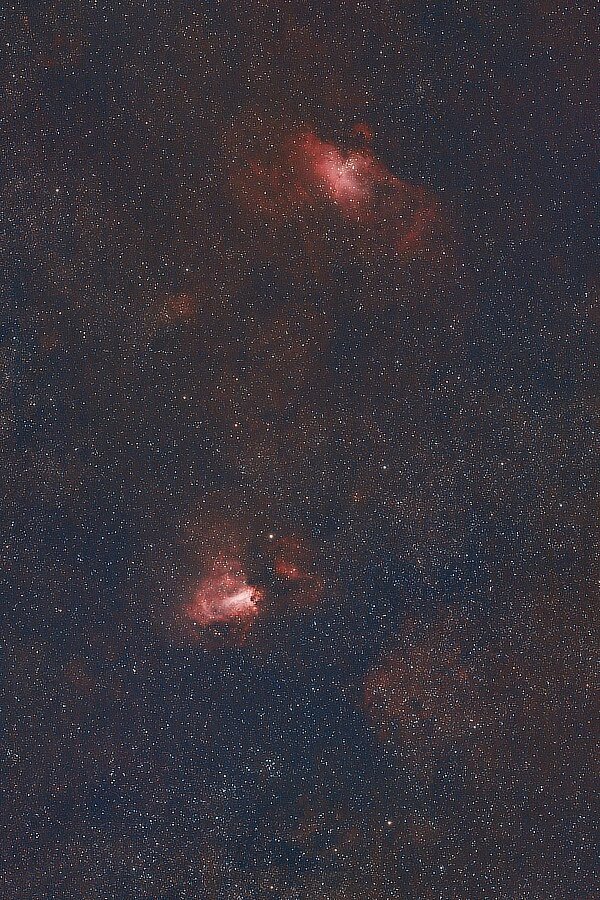
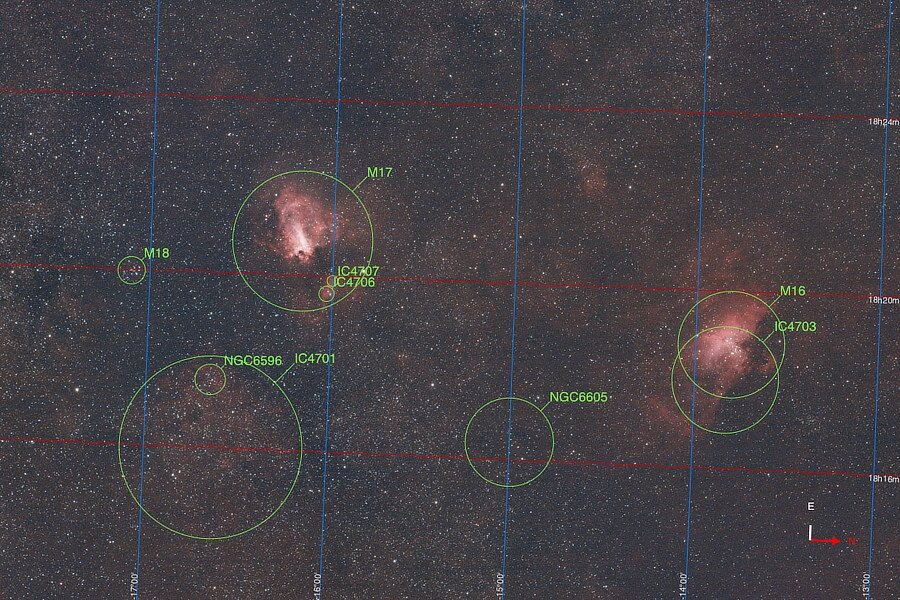
The Eagle and the Swan (or The Star Queen and The Lobster) ... Messier Object M17 a.k.a. The Omega Nebula, The Swan Nebula, The Horseshoe Nebula, The Checkmark Nebula or The Lobster Nebula is a colorful late summer nebula in the Sagittarius Constellation. In dark locations, you can see this one without needing binoculars or telescopes. Messier Object M16 — this is one of those deep sky objects that is one thing (a star cluster) but due to the surrounding other stuff (Hii region) the surrounding stuff’s fame causes everything in that region to go by the famous name. M16 (cluster) and IC 4703 (Hii region) together go by the name The Eagle Nebula or The Star Queen Nebula. The is where the famous Pillars of Creation are located. This is the equivalent of 37 minutes, 40 seconds of exposure. https://www.go-astronomy.com/messier.php?Messier=M17 https://www.messier-objects.com/messier-17-omega-nebula/ https://science.nasa.gov/mission/hubble/science/explore-the-night-sky/hubble-messier-catalog/messier-16 https://www.messier-objects.com/messier-16-eagle-nebula/ Part one of two.
-
Seeking recommendations on post processing apps
jerryy replied to Sleeping Dog's topic in General Discussion
This is a utility app that will let you view compressed raf files in QuickLook (finder): https://apps.apple.com/us/app/camera-rawx/id6587554858?mt=12 As far as low cost editing goes, … DarkTable, RawTherapee and GIMP are free and very, very good. The PhotoMator suite is low cost and decent. Affinity Photo is excellent, low cost and probably on sale at the moment. Do not let Apple’s hysterical, pearl clutching — get thee to a fainting couch warnings about using open source software keep you from trying and finding excellent tools for the jobs you want to use them on. Right now to open DarkTable, etc., just hold down the control key while clicking on the app. A menu will pop up presenting the dire end of civilization warning along with a button that says open anyway. Click it and you should be up and running. If you do want to muck around in the Terminal app, you can: https://www.darktable.org/install/ It is a standard approach. -
Focus peaking not working on manual lens
jerryy replied to DrKhanage's topic in Fuji X-T5 / Fuji X-T50
Your lens may be too wide for focus peaking to work well. While it is possible to test whether or not it works at all for that lens, if you are unable to use it in practical terms, the test result is essentially moot as far as being useful. [The test is to try using it while shooting downward onto the top of a small table lamp’s shade lit by a not overly bright bulb. That should give you contrast and focus separation while cycling through the color options.] Focus peaking with wide angle lenses seems to, unfortunately, depend on the particular lens, it works well with some, not with others. This is something various manufacturers struggle with as far as getting it to work on wide angle lenses. Here is one view: https://www.digitalcameraworld.com/news/focus-peaking-sucks-rangefinders-rule-and-progress-doesnt-always-move-forward# (a Leica body owner). I wish there was a better answer for the wide angle lenses other than ‘try a different one to see if it works’. -
Focus peaking not working on manual lens
jerryy replied to DrKhanage's topic in Fuji X-T5 / Fuji X-T50
Just to check, you have the M C S switch on the body front set to M. You say you are using a manual lens, so there is no need to check whether or not the AF/MF switch is stuck in AF. Touch screen mode is turned off? — If this is turned on, even in MF mode, touching the rear lcd screen will take you back into AF mode: https://fujifilm-dsc.com/en-int/manual/x-t50/menu_shooting/af_mf_setting/ In manual mode, pushing the rear command dial should “zoom in”, with differing zoom levels as you rotate the rear command dial, yes? As you rotate the focus ring, the subject should come in and out of focus, yes? I am not certain about the X-T50, but on other bodies, the peak lines are not lines, but are more like dancing dots, as you come into focus, more dots show up on the region that is in focus and then disappear or move to a new region as you move out of focus. If the scene is not very contrasty, you may not get many dancing dots, or they will be hard to see. Have you tried other colors? p.s. Welcome to the forum. -
The Messier Object M 57 posting on page two of this thread has a wider perspective added to it.
-
Need some feedback from and Old Fuji lover…
jerryy replied to Usaftrevor87's topic in General Discussion
This is playing into the megapixel myth a bit. The sensors’ sizes (dimensions) are almost identical, the higher resolution is coming from using smaller pixels, which can lead to less dynamic range, more noise and diffraction. It is possible in some cases to get more detail, but the benefits are limited. Otherwise, those high resolution cell phone cameras would have made all of these cameras so obsolete, no one would use them. -
-
I believe you need to set the shutter type to mechanical, not electronic, set the top right side dial to M, and use the rear command dial to scroll through the shutter speeds until you get to bulb mode. I do not have a X-S10, so if there is something else that needs be done, maybe someone else will answer before it is too late. p.s. Welcome to the forum.
-
Welcome to the forum. Your camera has both a mechanical shutter (ms) and an electronic shutter (es). The ms tops out at 1/4000 and the es goes up to 1/32000. You can set your camera to only use one type of shutter if you wish or you can set it up to use both, it will then switch between them as its built-in algorithms choose depending on your other parameters — ISO and f-stop when using aperture mode. The setup menus allow you make the choice between the shutter options. Right now, it sounds like the “both” option is selected.
-
Welcome to the forum. There are plenty of star trail exposure time calculators available for the various guidelines (“rules”), such as https://www.photopills.com/calculators/spotstars Put the body on a tracking mount and periodic error is the more important obstacle to keeping stars round. On a tracking mount, 3 to 5 minute exposures are typical for each frame for cameras that have the ability to store longer exposures without over saturating the pixels. For some camera bodies, a 20 second limit is a good idea, but that is more due to the full well depth size for that camera body rather than to prevent or allow trailing. 20 seconds for some bodies is the limit where brighter objects begin losing color by over saturating, turning the pixels white, especially when shooting in jpg instead of raw.
-
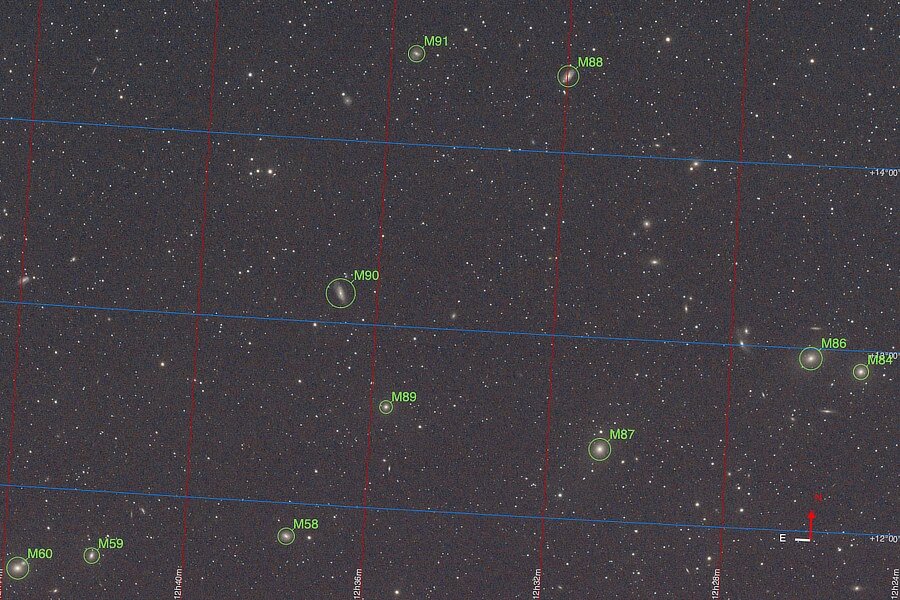
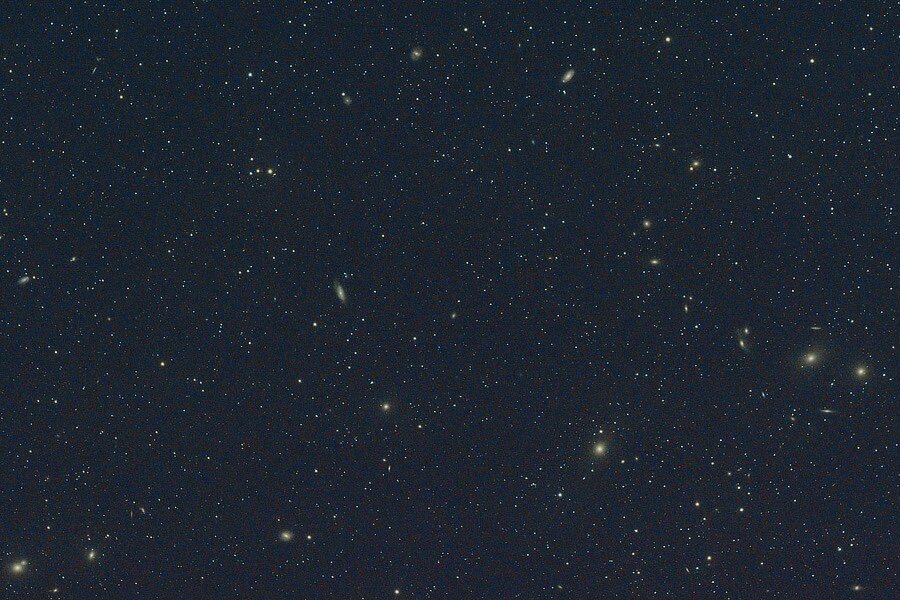
East of Markarian's Chain... Back on page one of this thread, there is a posting for Markarian's Chain, a swooshing line-up of galaxies. The sky east of the Chain is also filled with many wonders: (On the right starting with Messier Object M84 and swooshing upwards towards the left is the Chain.) This is the equivalent of 32 minutes of exposure. https://www.messier-objects.com/markarians-chain/
-
Once you absorb that, and try some ideas to see if they work for you, it will be time to chat about star trackers and goto mounts. Alt-Az and German Equatorial Mounts! (Remember the bit about joining the local astro club). oh, there is nothing at all bad about using dedicated astro cameras, they work extremely well and can get you fantastic images if you put the effort into learning how to use them. But they are single purpose dedicated equipment, they do not work so well if you want to grab a camera and photograph kittens and puppies in action or birds in flight.
-
Hmm, intervalometer: start with the one built-in to your camera; https://fujifilm-dsc.com/en/manual/x-h2s/menu_shooting/shooting_setting/#interval_timer_shooting scroll down to the interval timer section. One thing to make certain, shoot completely in manual mode, set the shutter speed, f-stop (if you are using a lens) and iso all manually. Turn OFF long exposure noise reduction -- this type of noise reduction can be dealt with in your image editor by taking some blank or "dark" frames (with the lens cap on) right after you you shoot the "light" frames, put all of the dark frames in the editor as layers whose blend mode is set to average or better yet median, merge into a single layer and use as your master dark frame. Put it as a layer on top of the "light" frame and set its blend mode to subtract. Merge the two layers and continue onward in your processing (Uh, this may seem obvious, but also save everything separately as you are working in case you have to start over -- which does happen. Save early, save often). This removes hot or stuck pixels and can remove something called bias noise (if it is there). Save your money, save your money, save your money. Some folks (without any traces of irony or maybe just a hint of a smile) will tell you astrophotography is a black hole perched over your bank accounts. For every problem you encounter, there is a solution, it costs money, fixes the problem and creates an entirely new problem that has a solution that costs .... Turn OFF IBIS and OIS, these get in the way. The section I listed has some advice about tripods and power banks. In the summer time just use the camera's battery, along with a second back-up battery. Use the power bank with the appropriate adapter in the winter time (when the temperatures drop below 60 degrees Fahrenheit (16 degrees Celsius or so). Make sure the batteries are charged before you go out imaging, you should be fine for some few hours. Depending on your budget, the most important purchase you can invest in is the tripod and mount. Be careful about using low cost tripods or high dollar tripods because a lot of them are built with terrestrial photography in mind. When you are shooting at 1/200 or faster, small little minor vibrations will not affect the image. Shooting at 20 seconds or five minutes or so is a different matter, you may start thinking the vibration from heartbeats is finding their way into your image and smearing things. 😃 Here is one approach: https://www.berlebach.de/en/ (The site is in Germany, the prices are in Euros, replace the comma with a period to get an idea of US versions, i.e. 159,00 ---> 159.00, the prices will need to be converted into US dollars -- it is common outside of the US to use commas the way periods are used in the US.). Carbon fiber tripods can be good, if they are rated to hold 50 lbs. or more (23 kgs. or more) because these begin to be stout enough to absorb the teeny tiny, itsy bitsy vibrations that happen. Uh, remember if other folks are in the apartments or on the ship's deck, there will be vibrations. Try to have a lot of fun, because it should be fun, and can be very frustrating if you want it that way. The universe wobbles, so does everything in it. If it is possible, join your local astronomy club. You may be the only one imaging, maybe or maybe not, but you can get the chance to see how the equipment works and find out why. Because you are going to encounter things that will make no sense at all as to why you do that, but you need to do if you want the images.
-
Welcome to the forum. You absolutely can use a X-H2 for astrophotography. It should give you wonderful results. One quick note about using Fujifilm bodies for astro work, the sensors and the protective sensor “glass” are already more sensitive to the red (hydrogen alpha — Ha) and other colors than bodies from other manufacturers, those usually have to get something called astro-modded done to be that sensitive. That is similar to modifying a body for Infra Red (IR) photography. With the lens you listed, you are ready for landscape astrophotography, combining night skies with interesting foregrounds, or constellations, etc. If you like that type, then the 8mm through 60mm range is usually used for these images, you can find many used lenses in excellent shape for these images. For various reasons, go with prime lenses, the zoom lenses can work, but the primes work better. Your lens should be fine. Practice Manual Focusing! A lot of camera bodies do not auto-focus very well on stars. Your lens is not really well suited for close-ups of what are called deep sky objects (nebulas, galaxies, supernova remnants, etc.) you will need to use 90mm or longer focal lengths for that, the 135mm lens is very, very popular for that. A lot of folks will tell you to use a telescope to get the good stuff. Settings can be tricky. Use the lens wide open unless you need to stop it down to prevent chromatic aberration (CA) or coma — odd shaped stars in the frame corners. ISO 1600 at f2.8 should be okay, ISO 3200 may be a bit much if the area you are imaging in has light pollution, your image will not turn out well. If you have a lot of light pollution, you might need to drop back to ISO 800 or less and use stacking frames type of approaches to get an image rather than single frame image approaches. As far as time settings go, you will be taking long exposures, if they are too long, the stars turn into streaks, it is called star trailing, when done deliberately it is a cool effect, but can be annoying if you do not intend to do that. Try the 300 rule, that is divide 300 by the focal length to get the longest time setting you can use before the stars start trailing, 300/18 is about 16.7 seconds or 15 seconds using an intervalometer for the exposures. Full frame cameras use the equivalent 500 rule. Hopefully, this is enough to get you started. People write lots of books about these subjects and there are plenty of sites dedicated to the differing aspects of astrophotography.
-
Okay, sure, it is July. Autumn is on its way.
-
Would not a better question be about getting the subject into some kind of protection program?
-
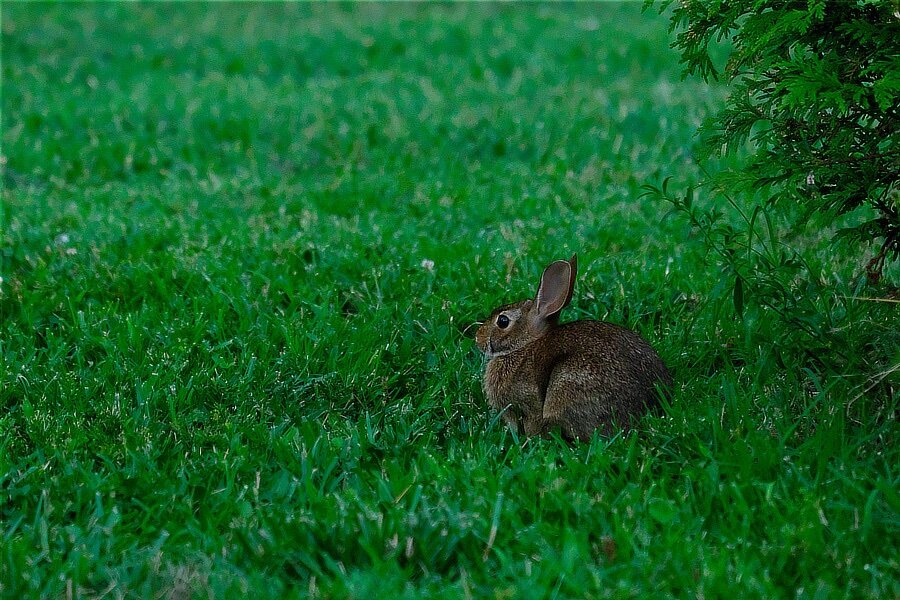
open thread... This is either an Appalachian Cottontail (Sylvilagus obscurus) or an Eastern Cottontail (Sylvilagus floridanus).
-
These are the publicly available sensors that Sony has for sale(at this time of writing). Of course, what they privately offer to OEMs is, well, private: https://www.sony-semicon.com/en/products/is/camera/index.html
-
Okay, I will ask, how are you able to look at both of them at the same time? Keeping both on at the same time is a battery killer, these two electronic displays are movie camera televisions (monitors) to put it in a different view 😀, keeping them running constantly (continually updating) takes a lot of juice that then cannot be used to get more images. When you use options two or three, the eye sensor is “off”. A simple button push to swap between the two options when you need to use one over the other is fairly easy to do.
-
Options two and three essentially turn the eye sensor off, these are always-on settings for either of those two, but only one at a time. You can set it up to switch between them. If you read a bit further to the part about the set-up menu section, screen setup -> view mode setting, you have some options regarding the evf and lcd display modes. The first and last options seem the same, but I think if you try them you will see a difference.
-
https://fujifilm-dsc.com/en-int/manual/x-h2/about_this_camera/display/index.html#choosing_display_mode Scroll down to the actual Choosing a Display Mode section